It should come as no surprise to anyone who’s known me for more than 5 minutes (or read more than one article on this blog): I’m a nerd and I like gadgets. In an effort to get the most out of my training, I’ve tried a variety of different services to track, analyze, and store my workouts, and I frequently see people asking questions about services such as Strava and TrainingPeaks online, so I thought I’d jot down a few Cliffs Notes to help people figure out which services might be right for them.
First, let’s stipulate that pretty much every fitness device manufacturer (Garmin, Jawbone, Withings, Suunto, et al) has their own branded website. I don’t use any of these (except Garmin’s, about which more in a minute). Most devices require you to sync them with the manufacturer’s website. Sometimes those websites can sync to others (more on that in a second), and sometimes they cannot.
The latest trend in this market is the emergence of services such as Apple Health and Microsoft Health that want to aggregate all sorts of your fitness data (with some surprising omissions), analyze it, and then give you “actionable insights.” The things I’m writing about here are all targeted specifically at fitness, not necessarily overall health. For example, none of these sites directly lets you track the foods you eat (though some partner with food trackers). I’m not writing about the Microsoft or Apple services (or Google’s for that matter…. hahahahaha, like I’d give Google all my health data) because I don’t use them, but that might be a good topic for a future article.
Garmin ConnectGarmin recently updated their Connect service, so the version I’m writing about is labeled the “modern” version on the service itself. There’s also a “classic” version which seems to mostly have the same features, but I don’t use it.
Garmin ships a very wide range of products that plug into Garmin Connect: from fitness trackers to multisport watches to action cameras to special-purpose swim and golf watches, if it says “Garmin” on the front and isn’t a GPS, it probably will display data in GC.
The screenshot below gives you an idea of what GC looks like. You can customize each of the tabs across the top (“Sports” being shown in this case) with data blocks, adding, removing, and positioning blocks as you like. The other day, a new block labeled “Golf” showed up, but I gave it the heave-ho posthaste since, of all the fitness activities I enjoy, golf is not one of them.

When I got my first Garmin device, I went to the GC site, signed up for an account, downloaded the sync software, and plugged in. This was all seamless, and the instructions provided were clear. Keep in mind that Garmin requires you to use sync software on your PC or Mac to sync your device, although if your device supports Wi-Fi or Bluetooth sync you may not need a computer at all. This sync software has nothing to do with the GC website itself, which you can use from anywhere.
(Personal note to my WP posse: there’s a decent Windows Phone app called Astro Fitness that can sync with GC.)
Overall, GC is my favorite of the connected-device services. While its social features are poor compared to Strava, and it lacks some of the specialty features from MapMyRide/MapMyRun (such as the ability to automatically choose a route if you give it a starting point and a distance), it looks good and is highly customizable. It also integrates pretty broadly into the wider fitness ecosystem; it can automatically sync with TrainingPeaks and Nike+ and can import food data from MyFitnessPal. Garmin’s support is forum-based and has done a good job answering the few issues I’ve raised.
Suunto MovescountIf you own a Suunto device, you’ll be using this to sync workouts from your device and to change many of the settings for the device itself. Suunto, in general, prefers a simpler on-device UI, so you need the website for things such as specifying which activities you want to track or what data fields to display on the watch. On the other hand, that makes the device a bit easier to use, though it means that if you forget to change a critical setting before a race or event, you can’t change it on the watch.
Below, you can see what a typical activity on Movescount looks like. Note that while Garmin Connect uses tabs, Suunto prefers a scrolling vertical layout, so you’re not seeing everything in this picture that would actually be displayed on the page.

Like GC, Movescount shows you the pace, speed, distance, and location of your activities. It’s important to remember that what you’re seeing is based what the device recorded. While some Garmin devices will compute recovery time themselves, Suunto’s devices don’t, so the recovery time and PTE figures you see here are calculated by the service. On the other hand, the Ambit 2s can calculate “swolf” swim metrics, so Movescount will show them to you.
One persistent issue I had with the Movescount web site is that the distances shown for swims don’t necessarily match what the watch says or what gets synced to external services. For example, if I swim 300m according to the watch, it’s common for the site to say that I swam 275m (or maybe 325m, if it’s feeling generous) but then to display the correct distance when I sync through Tapiirik. Suunto’s support is aware of this problem, but hasn’t fixed it in the six months or so since I reported it. That’s sadly typical of my experiences with their support; the staff seems friendly, but they don’t get stuff done. In addition, the site had multiple weekend-long outages during the nine months or so I was using it daily. While these outages are harmless, they were quite annoying
Movescount has fairly weak social features, although it can automatically post links to your workouts on Facebook and/or Twitter. The site has a ton of groups for various sports, but the ones I was interested in had very few people— a testament to Suunto’s niche status in the fitness world. (Perhaps the groups for diving, hiking, etc were better populated?) Overall, a decent tool but not up to the standard of GC in my opinion.
Strava
Strava’s tagline is “Prove it.” The goal of the site is to help you “analyze and compare your data against yourself, friends, and pros.” To do this, you can either use the iOS or Android app, or a compatible Windows Phone app such as CycleTracks, or a GPS device (which can be a watch, a bike computer, or any of the other supported devices) to track your workouts. As you ride and run, Strava tracks your performance; the fastest person on a given route is labeled as the “king (or queen) of the mountain” (KOM or QOM) and gets a little badge.
Post-workout, you get a display similar to the below. There are three interesting things about this summary. First is the data panel just to the right of the ride title. It shows average and max speeds, heart rates, etc. This is very similar to what you see on other similar sites. Second, notice the “top results” list above the map. Strava automatically tracked my progress across designated parts of the route (known as “segments”) and noticed when my performance was good.

Third is the segments list itself, which you can’t see on this page because the window wasn’t big enough. As you can see below, in the expanded view, for each segment I can see how I performed compared to other people who have ridden or run the same segment. The “Analyze” button zooms in on that segment to show graphs of speed, power, cadence, and elevation for the segment alone, while the “Compare” button lets you track your performance against the KOM or against anyone on your friends list. You can break your performance down to see how it stacks up against people in your age group, weight bracket, friends list, and so on. This is both powerful and motivating, especially when you couple it with the goals feature, which allows you to set a time goal for a particular segment.

Speaking of friends: Strava has the best social features of any of these sites. You can follow (and/or be followed by) your friends, but there are also extensive features for forming clubs. For example, our local “We Run Huntsville” group has a Strava club, so when I look at the activity list I see what my real-world running friends have been doing. Same with my Complete Human Performance coaching posse, and so on. Strava also has a healthy environment of challenges (such as “complete a half-marathon this month” or “bike 250Km”). These challenges don’t win you anything except a little digital badge, plus bragging rights, but as part of the overall goal-setting ethos of the site they’re valuable as spurs.
The basic Strava site is free, although you can pay more for the Premium version, which includes more analytical features, plus videos, workout plans, and other goodies. If you’re interested in giving Premium a try send me an email; I have a few codes that are good for a free month each.)
TrainingPeaks
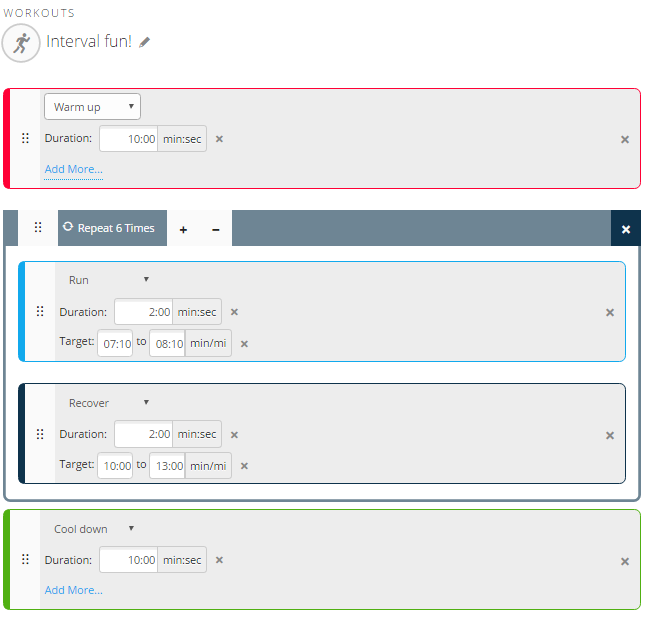
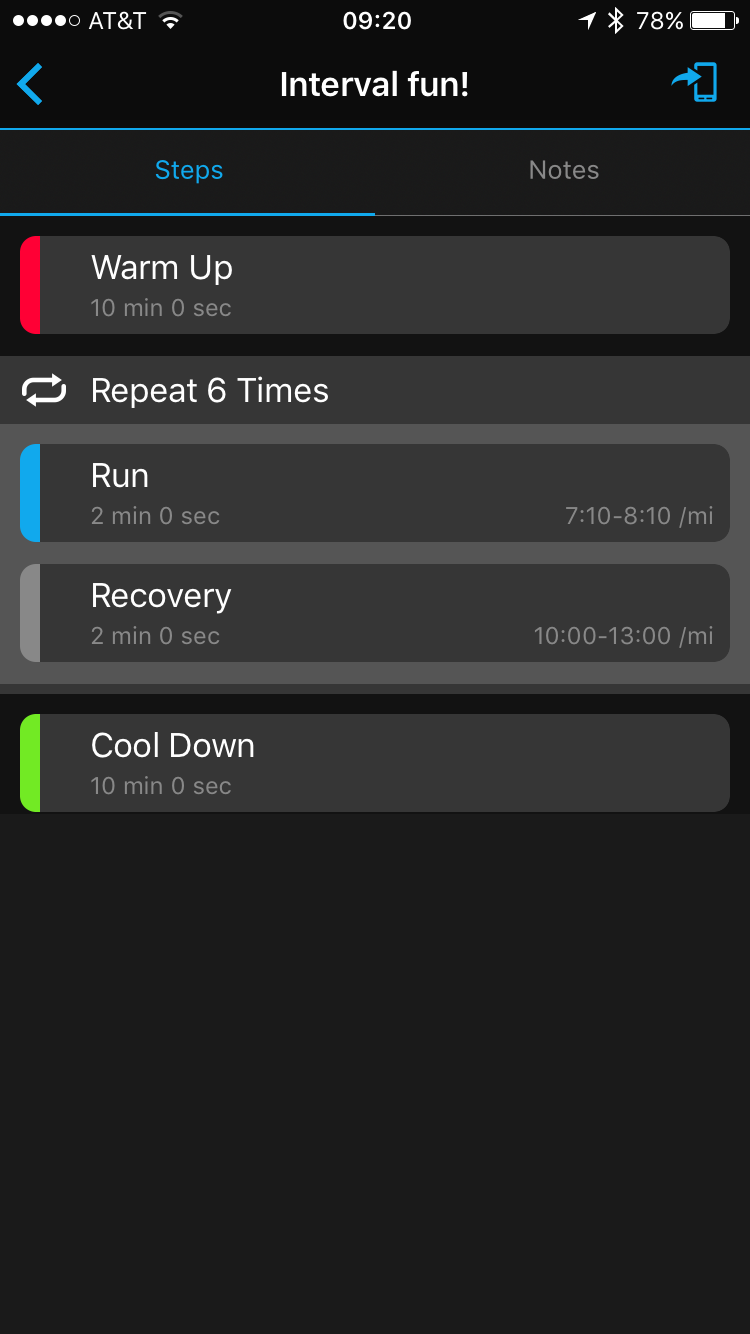
I use TrainingPeaks (or TP, as it’s universally known) because my coach makes me. He puts workouts in, and they appear on my calendar, as you can see in the screenshot below. Because TP syncs to Garmin (and other services), when I complete a workout its data is almost always automatically assigned to the correct workout; in rare cases, I have to manually download an activity file and then attach it in TP. TP calculates a bunch of metrics that my coach can use to keep my training workload where it should be. As an athlete, I don’t necessarily see all of this data (nor, as a novice, would I know how to interpret it), but the overall ability to plan and track workouts is very useful. You can use this solo just by putting in your workout schedule (and TP has training plans for marathons, various triathlons, etc. that help automate this process). I’d love to see the local Fleet Feet start using this for workout tracking, for example. One very nice feature of TP Premium is that it can export an iCal calendar, so when I tag a workout on TP with a time, it shows up in my calendar— a very useful aid to overall time management.
 One complaint I have about TP is that there’s no Windows Phone app, and their web site doesn’t work well at all in mobile IE. I typically copy weight workouts to OneNote (then turn them into checklists, yay!) but it would be nice to be able to see workout details on a device without that extra step. I also have often heard my coach and my fellow CHP athletes complain about refresh and stability problems with TP but haven’t had many problems with it myself. I will say that TP’s support staff are excellent; every time I’ve had a question or problem, they have quickly and efficiently resolved it. The premium version of TP is $10/month.
TrainerRoad
I LOVE THIS SERVICE and have written about it a couple of times before (most recently here). It combines bike workout plans with power measurement (either using a power meter or an algorithm that estimates power output based on your wheel speed and the resistance profile of your indoor trainer), then gives you immediate feedback about your power on the bike. You run the TR app on your iOS device or PC, and you immediately see what your performance looks like. The center graph in the screenshot below is basically what you see during a workout: the yellow trace is your power output. During a workout, you also see your cadence, heart rate, and other useful data. It makes working out to a specific standard much easier: you ride until the yellow line is where you want it over the blue, then hold it— easier said than done, but much easier (at least for me) than trying to figure it out on my own.

TR costs $10/month, which gives you access both to the service (and its ability to sync directly to Garmin Connect, which is nice) and its workout library, which includes all sorts of cycling-specific training plans. I recommend it highly.
Tapiirik
Tapiirik is very simple: it syncs services. You can choose to sync any supported service to any other supported service, in any combination. For a while, I had RunKeeper, Strava, TrainingPeaks, and Endomondo all set up. Suunto would sync to RunKeeper, which would sync through Tapiirik to the other services I use (some of which had their own sync relationships, such as the link from RunKeeper to Fitocracy). Now that Garmin, Strava, and TrainingPeaks all talk to each other, I don’t use this much any more but it’s a valuable tool if you want to talk to any of the services it supports.For $2/year this is a superb value.

Everything else
MapMyFitness: this is really a collection of very similar sites: MapMyRide, MapMyRun, etc. My favorite feature here is the “route genius”, which will lay out a route of the specified distance given a starting point and workout type. This service costs around $30/year for the premium version, which is required to use “route genius”. I use it because I got a year for free when I bought my headphones, but you may not find the features that compelling.
Nike+: this is the software I first started with. I liked it, but it only does running, and it only works with the Nike+ app for iOS (and maybe Android?) While the presentation is top notch, it lacks many of the features in Strava and Garmin, so I ditched it. Garmin recently added sync with Nike+, so if I ever go back to an iOS device I might take a look at it again.
There are lots of other services in this same mold: Runkeeper is another example. And then there are tons of apps that work with these services on various platforms… and more coming all the while. So this article isn’t comprehensive, and it will probably be outdated sooner than I’d like, but such is life with cloud services.. even when those services are supposed to be for something fun.