
When you file and fly an IFR flight plan, you’ll have an assigned altitude for every segment of the flight. You’re not permitted to deviate from this altitude without permission (except in emergencies); the altitude obviously has to be high enough so that you don’t hit anything on the ground, and it may be capped on top to keep you away from other aircraft, clear of military training airspace, and so on. (There are several different varieties of minimum altitude that you might be assigned on a route, but that’s a distinction for another day.)
These altitude assignments can often be expressed as constraints. ATC might, for instance, say “N32706, descend pilot’s discretion 4000”, which means I’m cleared to go from whatever altitude I’m at down to 4000′ at whatever rate of descent I want. I’m still not cleared to descend below 4000′ though. And of course, there are lots of constraints on instrument approaches, where we’re commonly told to maintain an altitude between an upper and lower limit at different segments of approach.
It’s common for air traffic control to give pilots crossing restrictions, too. For example, airplanes flying into Norcal Approach’s airspace will often be told to cross KLIDE “at or above 12000”. If they’re flying the ILS 30L (an excerpt of which is shown below), they’ll be told to “cross KLIDE at or above 4000, reduce speed to 230 knots”. You can tell that there’s a restriction there because of the horizontal line under the altitude– an underline means “at or above”, an overline means “at or below,” and both together mean “at”.
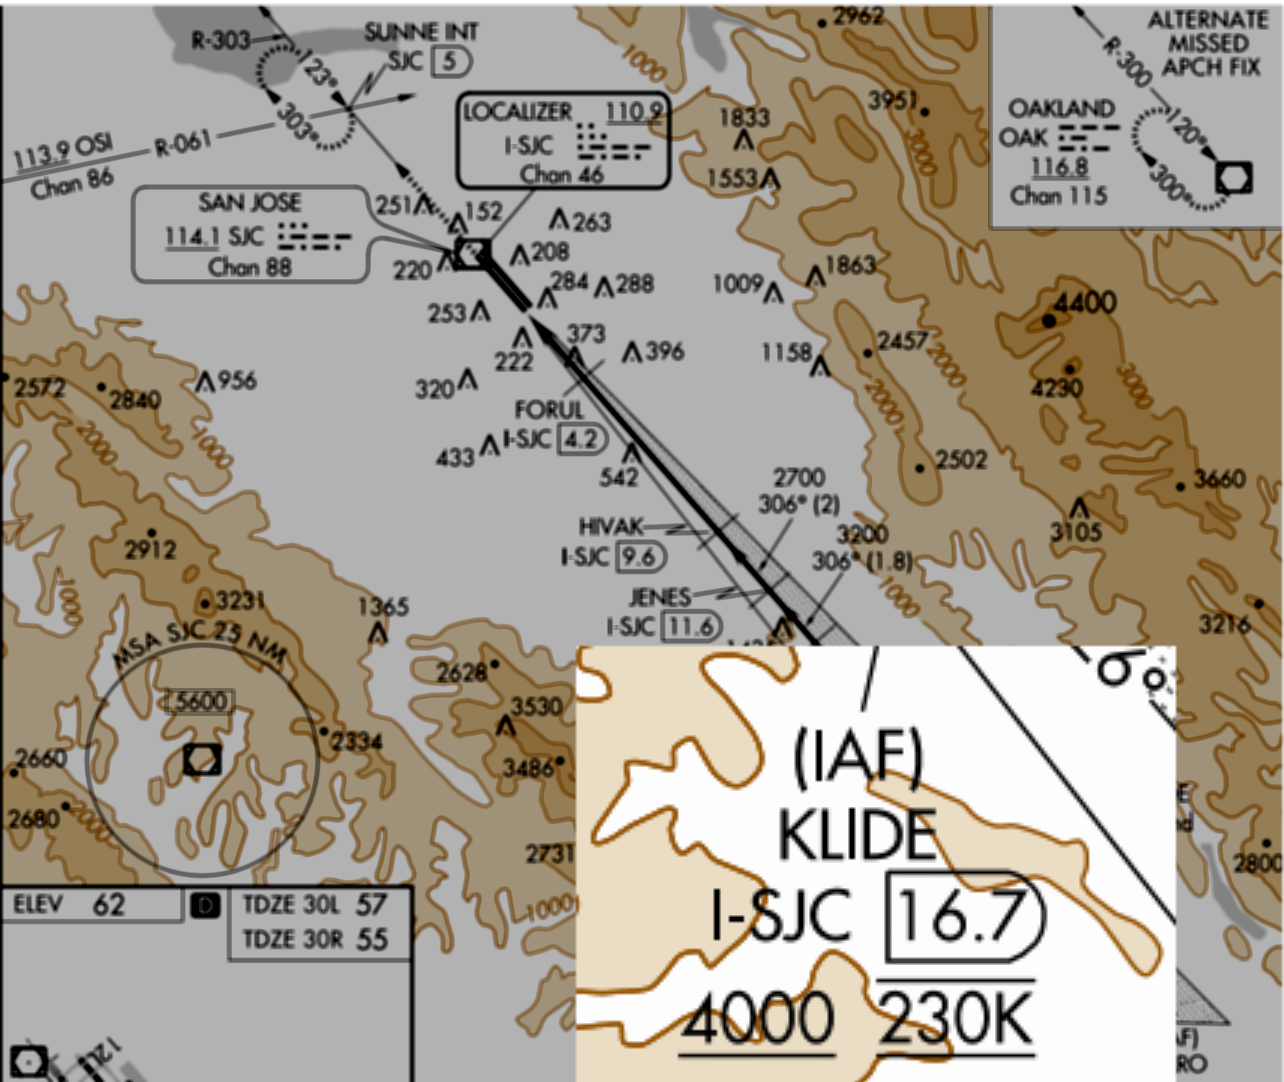
Those horizontal lines are important
An example I’m personally familiar with is that, when you fly into McCollum Field in north Atlanta from the west, the Atlanta Center controller will typically tell you to cross 35mi west of the airport at a specific altitude. In days of old, I’d just do this manually, which required a bit of math– “a standard 500 foot/minute descent at X airspeed means I need to start descending at Y minutes.” The IFD540 makes crossing restrictions really simple to track, but the interface for doing so is a little weird.
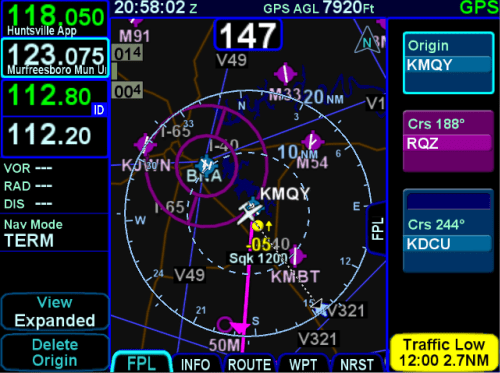
To specify a vertical constraint, you use the FMS page. The problem is that, by default, the FMS page shows the flight plan as a strip along the right edge of the screen, and you can’t see the fields necessary to enter the constraint. The example below (taken from Avidyne’s excellent Windows simulator) shows what I mean– you can see the flight plan in FMS view but, unless you know this One Simple Trick, you can’t put in crossing restrictions.
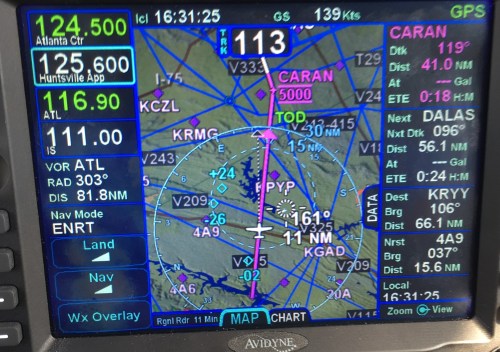
Tapping the “FPL” tab on the left edge of the flight plan data strip changes your view, though. In the expanded view, it’s easy to specify the distance and altitude you want, as you can see in this picture from the actual IFD540. ATC told me “cross CARAN at 5000” and so it was a trivial matter to specify a crossing distance of 0nm and an altitude of 5000 feet. I could just as easily have handled an instruction like “descend to 5000 5nm west of CARAN.”

As soon as I put the restriction in place and switched back to the map view, I could see a new “TOD” (top of descent) circle showing me where to start my descent. In addition, notice that CARAN is now bracketed by lines above and below its name– that’s because I specified I wanted to cross at 5000. If I had said “at or above” or “at or below,” the symbology would reflect that.
There’s also an audio alert which sounds just like a doorbell– so If you start a 500fpm descent when you hear the chime at the indicated TOD, you’ll arrive at the specified crossing point at the right altitude. This is a very handy feature, especially since you can set any combination of distance and altitude. Want to make sure you arrive right at pattern altitude when coming into an unfamiliar airport? Set a restriction for, say, 2nm on the approach side of the airport for pattern altitude and voila!


