Good news: we finally got the long-awaited CGR-30P instrument installed in our plane! Back in February, I said we’d put the plane in the shop for the actual install and, rather optimistically, said that I thought we’d probably get it out within a week or two. I could write a long, sad story about the various difficulties we had, including the unexpected departure of the shop manager, his failure to tell us we needed to do a pre-install maintenance check flight, and so on, but the details are both boring and depressing. Enough to say that the install is done, there have been no major problems with it so far, and we’ll probably find another shop to use in the future.
Anyyyyyway, here’s what the finished product looks like. We had it installed in the panel in the spot formerly occupied by a defunct Stormscope, in the upper left corner of the panel. The plastic cover that Piper uses on its panels obscures the tachometer redline, which is annoying but not insurmountable.
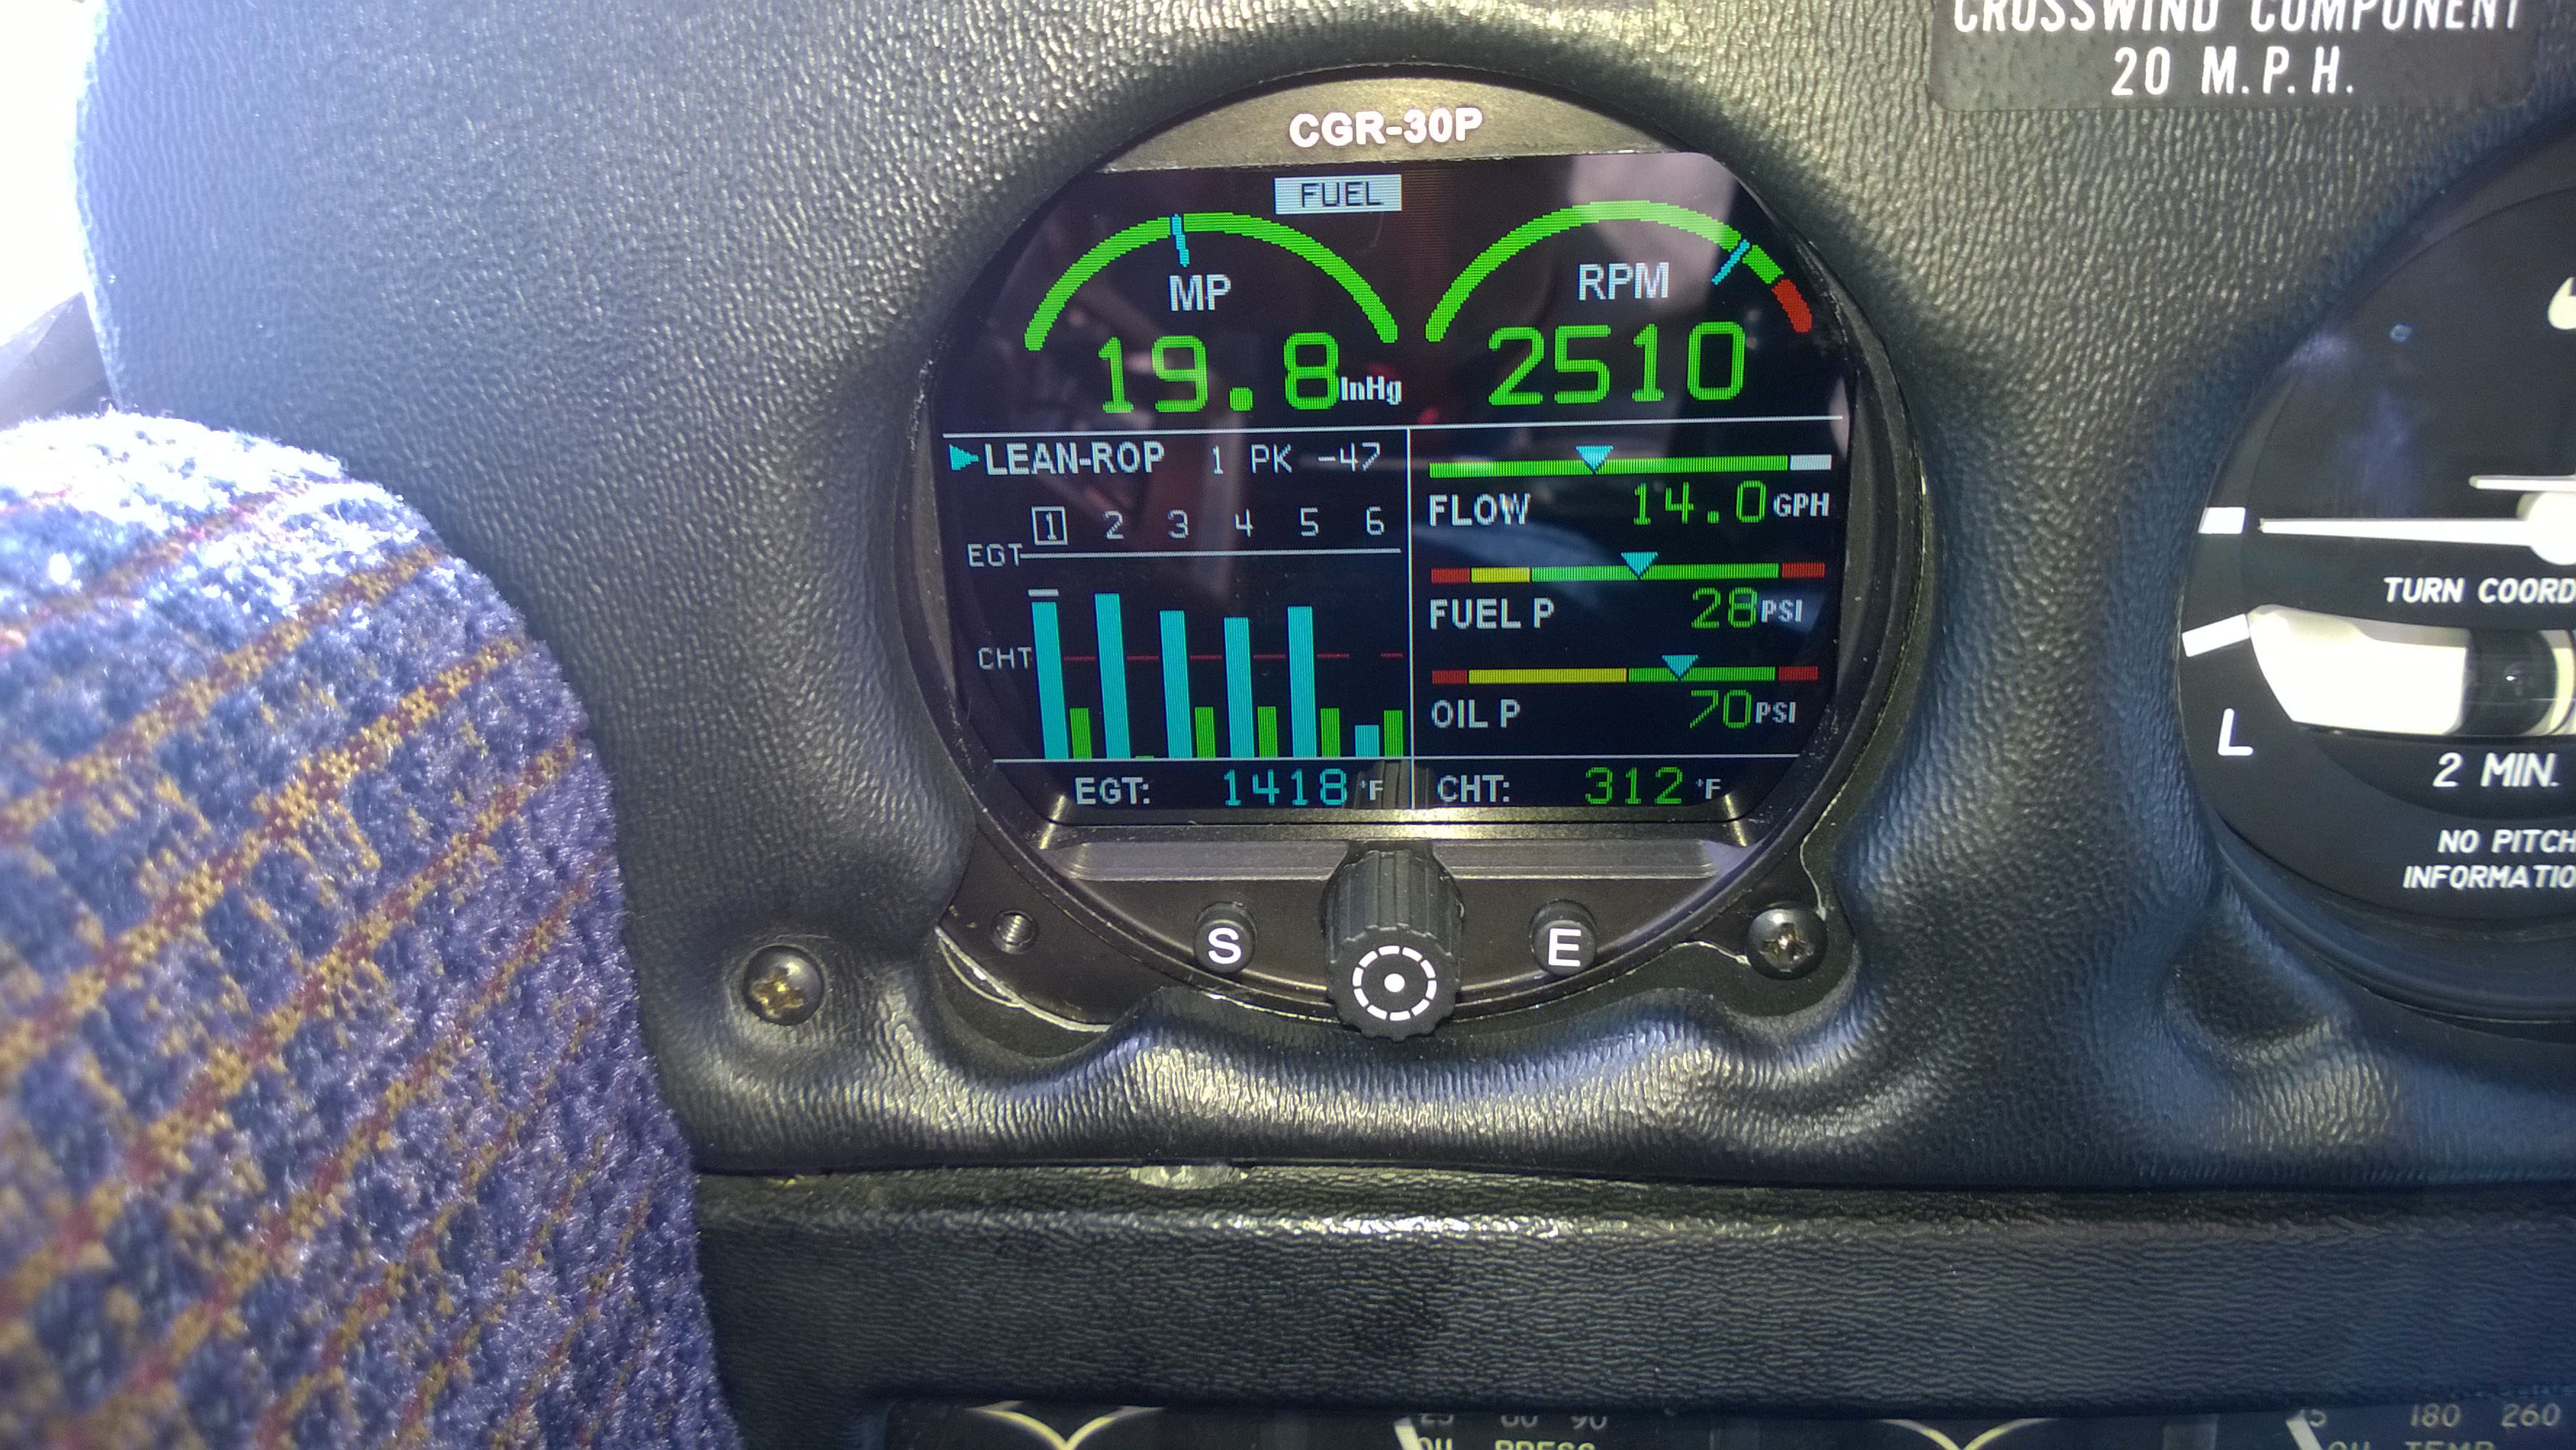 The rest of the installation is unremarkable; the CGR unit uses a small box known as the EDC (for “engine data computer”) that’s installed in the baggage compartment. All of the temperature probes and transducers feed data to the EDC, and a simple single cable runs from the EDC to the panel. In the engine compartment, there are six probes each for cylinder head and exhaust gas temperatures, a fuel pressure transducer, a fuel flow transducer, oil pressure and temperature transducers, plus an outside air temperature (OAT) probe mounted on the pilot’s side of the fuselage. The picture above shows manifold pressure and propeller RPM at the top, an EGT/CHT bar graph in the lower left side, and fuel flow, fuel pressure, and oil pressure on the lower right.
The CGR30P is connected to the master bus, not the avionics bus, so when you power on the master switch it comes on. Although it’s possible to use it as a fuel tank gauge, that would require a bunch of additional wiring, so we kept the analog fuel tank gauges and use the CGR to monitor fuel flow. When it boots, you can specify how much fuel you’ve added and then it will track both the flow (by using the flow transducer) and your fuel remaining (by subtraction).
The control scheme is simple; the “S” pushbutton sequences between different screens on the lower half of the instrument. The rotary knob (which can be pushed to select) moves a small carat cursor around between fields. The “E” button exits what you’re currently doing. This takes a little practice, but it’s easy to learn. For example, if I want to lean the engine, I press S until I see the CHT display, then use the rotary knob to select the CHT display type, press the knob in, and dial it until it reads “CGT ROP” or “CGT LOP.” Easier said than done.
At first, it took me a minute to remember that the old analog fuel flow gauge had been disconnected while I was priming the engine. Luckily I caught on, and that gauge is now placarded as inoperative so I won’t keep looking at it. Apart from the novelty of looking at a color screen instead of a 1950s-era analog instrument, engine start, taxi, runup, and takeoff are completely unchanged. Leaning the engine for cruise will take some getting used to; because EGT6 is wrong (see below), the lean-of-peak and rich-of-peak methods are just guesswork, so I stuck with setting approximately the same fuel flow I used back when the analog gauges were connected. I was very pleased to see that setting the throttle so that the CGR read 16″ of manifold pressure gave the same steady 500fpm descent rate that 16″ of MP would on the analog gauge. In fact, the only discrepancy I noticed was that the electronic tach reads 80-100rpm faster than the mechanical tach, probably due to flex or looseness in the mechanical tach cable.
The refresh rate, quality, clarity, and lighting of the CGR30P screen are all superb; it was easy to read it in all lighting conditions, including direct sunlight (though I haven’t flown with it at night yet).
Sharp-eyed readers may notice that the cylinder head temperature bars (the green ones) don’t seem to show much of a temperature on cylinder 6. During my first test flight, I found that the EGT for that cylinder was suspiciously low, although the engine functions just fine. We think there’s a loose connection, which we’ll troubleshoot once we get the airplane back from annual. For a while, I was sure that CHTon cylinder 2 was wrong, but no, it was just that I’d chosen to display the differentials for CHT, so that the coolest cylinder reads as zero and the other cylinders show how many degrees above the coolest they’re running.
I had to fix a few other things; the CGR30P didn’t know what the analog tach’s total hour reading was, and it didn’t know that it was connected to our KLN94B GPS. The GPS feeds the distance to the current waypoint and the total flight plan to the CGR, which can use it to show how much fuel you’ll have when you get there. The CGR is also supposed to feed fuel data back to the GPS, but ours is old and doesn’t know how to use that data. Newer GPS units can display a range ring that shows graphically exactly how far you can fly– and as you change fuel burn by changing the throttle or mixture settings, the ring dynamically changes to show how far you can go. The GPS integration still isn’t working quite right, though; I need to tweak it a bit more.
By about 30 minutes into my flight to New Orleans, incorporating the CGR into my scan was second nature, and I feel comfortable operating it. I’m looking forward to downloading engine performance data and having it analyzed to see what we can learn about the health of the engine and how to operate it for the greatest efficiency and longevity– the real reason behind getting the monitor. So far, it’s a solid device and I’m happy with it.


Pingback: First impressions: flying the Avidyne IFD540 | Paul's Down-Home Page